
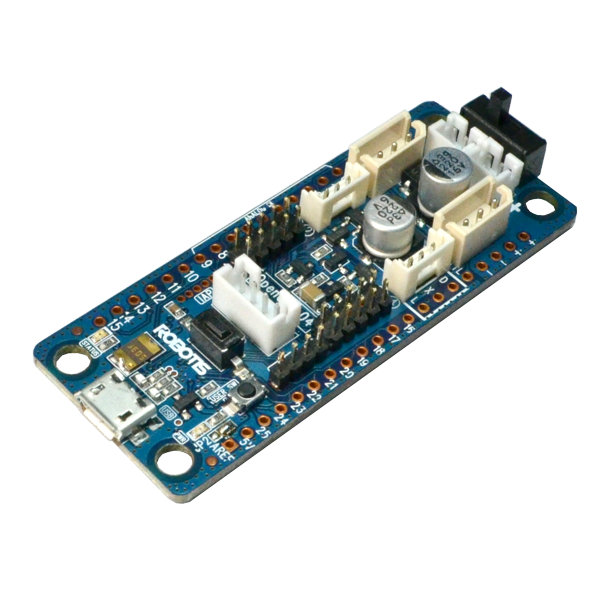
Opencm 9.04 by Robotis
Firmware

Drive Dynamixel servos from a web browser
The ROBOTIS OpenCM 9.04 is a small open-source controller made for Dynamixel smart servos. With Synthiam's EZB firmware it becomes an EZ-B compatible board, and ARCx's Dynamixel Servo Driver turns every servo on the chain into a normal Synthiam servo for animations, joysticks, scripts and AI.
How the OpenCM 9.04 works with Synthiam. Flash the DJs OpenCM 9.04 Firmware (in the Firmware section below) and the board speaks the EZB protocol over USB at 921,600 baud. In ARCx, the Ezb Connection skill connects to its serial port, and the Dynamixel Servo Driver sends servo commands through the board's Dynamixel UART. In ARC, use the EZB Connection and Dynamixel skills. We recommend ARCx: it runs on Windows, Linux and Raspberry Pi and is used from any web browser.
What is the OpenCM 9.04?
The OpenCM 9.04 is a small, open-source microcontroller board from ROBOTIS with a 32-bit ARM Cortex-M3 processor. It is designed around Dynamixel smart servos, which talk to the board over a TTL serial bus: several servos share one data line in a daisy chain, each with its own ID.
With Synthiam's firmware it acts as a robot brain interface that ARC and ARCx send commands to: move a servo, read a sensor, run a behavior. The same board is the controller inside the ROBOTIS MINI (Darwin Mini) humanoid, which Synthiam controls with this firmware.
OpenCM9.04-B vs OpenCM9.04-C. The C version is the same as the B version except that the two standard TTL connectors (used for the AX series) were replaced with XL-type TTL connectors (used for the XL-320). Both B and C versions are supported by the Synthiam firmware.
OpenCM 9.04 at a glance
| Type | Open-source microcontroller board for Dynamixel servos |
|---|---|
| Maker | ROBOTIS |
| Processor | STM32F103CB, 32-bit ARM Cortex-M3, 72 MHz |
| Memory | 128 KB flash, 20 KB SRAM |
| Supply voltage | 5 V to 16 V |
| Connection to Synthiam | USB (micro-B) at 921,600 baud; Bluetooth optional |
| Servo bus | Dynamixel TTL |
| Synthiam uses it for | Dynamixel servos, plus digital, PWM and ADC ports |
| Website | ROBOTIS store · e-Manual |
What you can do with an OpenCM 9.04 in Synthiam
Dynamixel servos
Each servo maps to a Synthiam virtual port (V0, V1...). Read position, temperature, voltage and load, scan the bus, change IDs and reboot a servo that shut down.
Poses and animations
Build walking gaits and gestures in Auto Position or on a timeline in Servo Animation. Several servos move together in one sync-write packet.
Board I/O
Digital read/write, PWM duty from 0 to 100%, hobby servos on digital ports and 10-bit analog inputs, all from robot skills and scripts.
Joysticks and controllers
Move servos from an on-screen pad, a gamepad or a MIDI controller. Servo Pad is a quick way to pose a robot by hand.
Blockly, JavaScript and Python
Program behaviors visually or in code. Scripts move Dynamixel servos with the same Servo.setPosition() they use for any other servo.
AI and voice
Speech recognition and text to speech on the computer, AI chat robot skills, and ARCx's MCP server so AI agents can move the robot.
Dynamixel connectors, UARTs and firmware settings
XL-320 servos (XL-type 3-pin connectors)
The XL-type 3-pin connectors are designed for the Dynamixel XL-320. On an OpenCM9.04-C these are the connectors you will usually use.
- Connect XL-320 servos directly to the board.
- Control them with the Dynamixel skill on UART 0.
AX / MX servos (Molex-style connectors)
For AX and many MX series servos with Molex-style TTL connectors, you typically need the OpenCM Expansion Board to plug them in easily.
- Add the Expansion Board to get the compatible ports.
- Connect AX/MX servos through it and use UART 2.
A UART is a built-in serial channel on the controller. Synthiam sends servo commands through that channel, and the servos answer on the same line. Pick the UART in the Dynamixel skill to match how your servos are connected:
| Synthiam UART | OpenCM serial port | Used for |
|---|---|---|
| UART 0 | Serial1 | The board's own Dynamixel TTL connectors. Use this when the OpenCM 9.04 is used by itself (no expansion board). |
| UART 1 | Serial2 | The 4-pin communication port, where a Bluetooth module connects. |
| UART 2 | Serial3 | The OpenCM Expansion Board Dynamixel ports. Firmware version 4 added a receive buffer for this port. |
Settings in the firmware
These lines near the top of the firmware's .ino file decide how the board talks to Synthiam:
#define _PortCnt 26
#define _AnalogPorts 10
#define _FIRMWARE_ID 0x00000007
#define _BAUD_RATE 921600
#define COMMUNICATION_PORT Serial
_PortCnt and _AnalogPorts are the digital and analog port counts, and COMMUNICATION_PORT Serial is the USB port. Most Arduino-style boards run at 9600 baud, so remember to set 921,600 in the connection settings. To connect over Bluetooth instead,
change COMMUNICATION_PORT to Serial2 and _BAUD_RATE to 9600 (or whatever your Bluetooth module uses); see the
Darwin Mini page for the steps.
| Firmware capability | Detail |
|---|---|
| Connection | Native USB, 921,600 baud |
| Digital I/O | Read and write; PWM duty 0-100% |
| Hobby servos | PWM servos on digital ports, with release |
| Analog inputs | 10-bit (0-1023), scaled for Synthiam; Ax ports also work as digital ports |
| Hardware UARTs | Receive buffering, adjustable baud rate |
| Dynamixel | Through UART 0 or UART 2 with the Dynamixel skill |
ROBOTIS documents the board's own pins in the OpenCM 9.04 e-Manual: 26 GPIO, 10 analog inputs (A0-A9), PWM on pins 2-14, the user LED on pin 14 and the user button on pin 23.
Set up the OpenCM 9.04 with ARCx
- Identify your hardware. Is the board an OpenCM9.04-B or -C? Are the servos XL-320 or AX/MX? XL-320s plug into the XL-type 3-pin ports; AX/MX servos go through the OpenCM Expansion Board.
- Install the firmware. Install the Arduino IDE and the ROBOTIS OpenCM tools for it (see the ROBOTIS e-Manual), download the firmware from the Firmware section below, then compile and upload it with the firmware upload tutorial.
- Power the servos. Dynamixel servos need their own supply at their rated voltage; USB alone is not enough to move them.
-
Connect from ARCx. Install ARCx and open the Ezb Connection configuration.
Select EZB 0, set Baud rate to
921600on the Connection tab and save. In the main window, pick the board's serial port and press connect.COM3 Windows (example) /dev/ttyACM0 Linux (example) Baud rate 921600 -
Add the Dynamixel Servo Driver. On its Bus tab choose EZB 0, port Hardware UART 0 (or Hardware UART 2 with the expansion board),
and the servos' baud rate: AX-12 and XL-320 servos ship at
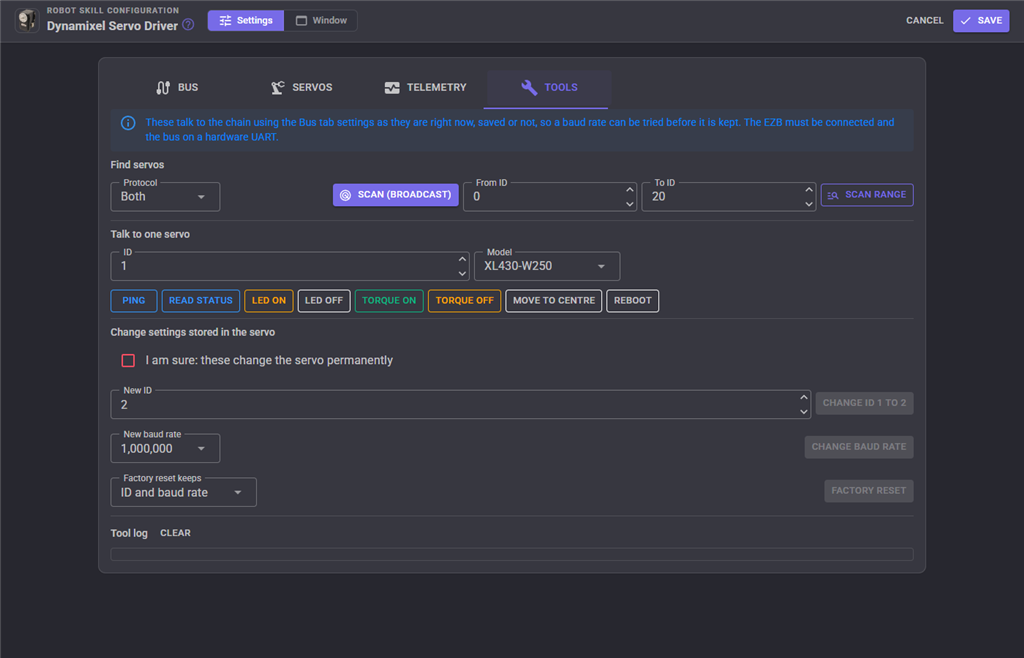
1000000. - Find and map the servos. Press Scan bus on the Tools tab, then add a row per servo on the Servos tab: the virtual port, the ID and the model.
- Test one servo first. Press Initialize, move a single servo from the Servo skill, check its direction and range, then connect the rest.
Using ARC? Add the EZB Connection skill, choose the COM port, set the baud rate to 921,600 and connect. Then add the Dynamixel skill and select UART 0 (or UART 2 with the expansion board).
Good to know
- Every servo on one bus must use the same baud rate and a different ID.
- The servo model setting chooses Dynamixel protocol 1.0 or 2.0 and the right control table, so set it correctly.
- On a hardware UART the driver can read positions, temperature and load as well as move servos (firmware version 2 and later).
Both work; ARCx is recommended
| ARCx Recommended | ARC | |
|---|---|---|
| Runs on | Windows 10/11 x64, Ubuntu 24.04 x64 and ARM64, including Raspberry Pi 4/5 | Windows |
| User interface | Any web browser, several people at once; closing the browser leaves the robot running | Windows desktop application |
| Board connection | Ezb Connection, USB serial at 921,600 | EZB Connection, USB serial at 921,600 |
| Dynamixel skill | Dynamixel Servo Driver: AX-12/18, MX-28/64/106, XL-320 and X series; any ID on any virtual port; telemetry; sync writes | Dynamixel: the long-established skill this board was first used with |
| AI agents | Built-in MCP server | Through robot skills |
When something does not work
Frequently asked questions
Serial2 at 9600). Once paired, the robot appears as a serial port.
This is proven in ARC; in ARCx it may work through the paired serial port but has not been tested yet.
Put your Dynamixel robot in a web browser
Flash the firmware, connect ARCx, and every Dynamixel servo becomes part of a Synthiam robot.
Just an update: I have not been able to get Arduino to recognize the board. I redid all of the Arduino installs (IDE, driver, etc.). Then I tried the Open CM IDE (that is based on Arduino) and it has an error message that the board is not responding. I have a question out to Trossen Robotics where I purchased the board to see if they have any ideas. I have one more resource to see if there is some different way to interpret the instructions on the Robotis site. I haven't had issues with my VM previously. Heavy sigh. I am also going to order the EZ IoT and cable to see if that works with my setup. I really wanted the read/write capability of the servos...and I have not created cables before so would need detailed instructions. :-) I appreciate your help.
the EZ-Robot IoTiny doesn't support reading and writing because it doesn't have a hardware uart. You'd need the EZ-Robot EZ-B v4 for that. Or, there might be another arduino that supports it but not sure what.
I'm super surprised the open cm usb won't work with the parallels. Can you run the arduino ide to program the open cm in mac os?
I knew that the IoTiny did not support both read and write but I wanted an inexpensive entry to experiment. :-). I had tried using Mac OS previously and got a similar message. HOWEVER, I found the information from Robotis on how to "recover" the board if it is connecting but not accepting an upload. And it worked! I just successfully connected to the ARC software. Tomorrow I will try out moving a Dynamixel and hopefully move forward with my robot arm. I am excited! Having the IoTiny will give me a chance to compare and try audio, so it's all good. Thank you so much for your help. I am sure we will chat again at some point.
Hi DJ,
Unfortunately I am now having trouble with the final step using the Dynamixel plugin. It shows a successful install and the option is available to add when I am in ARC. I get the following error message. Screen Shot Error Message.pdf (Hopefully you can open the file.). It sounds like it is looking for ARC.DLL... I removed the plugin and reinstalled but that did not fix it.
I will continue to look for previous discussions on the topic, but I am hoping you have an idea on the solution. Feel free to redirect me if needed.
You're using ARC - and plugins are only supported in ARC. Install ARC to use plugins
ARC is being deprecated and will no longer exist in a week or two. See details of ARC here: https://synthiam.com/Products/Releases/ARC-Beta-2020-03-11-00-19052
Beautiful. It is working now. Thanks again!
Hi again. I apparently spoke a bit too soon. ARC is working, plugin is working, board is connecting...the software is not finding my Dynamixel AX12A. I have confirmed the ID numbers and baud rates and which UART port the OpenCM Expansion Board uses (UART 1). I reviewed the Hack video and the instructions. I am using the openCM9 with the expansion board so maybe that is what's different? Your thoughts? As always, I do appreciate your help.
To be more clear - I tried both UART 0 and 1 in the plugin and still no connection.